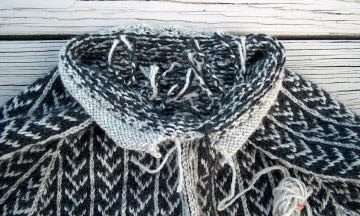
Sweater Construction: Short Row Necks
Topic: percentage knitting
This morning on the KNITLIST, this subject came up, and once again, I thought it timely to post instructions to budding pattern designers.
Let me preface the directions by saying that this uniquely worked neck was first illustrated for me in Elizabeth Zimmermann's KNITTING WITHOUT TEARS . This book opened up a door for me in sweater design, and once going through I have never looked back.
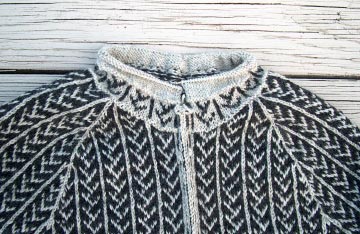
Well fitting necks are lower in the front and higher in the back. Working circularly knit sweaters has always been a challenge, as the easy way to finish off, or start, a circular sweater generally results in a neck that crowds the chin. Necks are commonly 2-4 inches higher in the back for most adult sweaters....1-2 inches for kids. If you know your row gauge (work a swatch to find it!) you can figure out for yourself how many short rows to add to any sweater pattern for the perfect fit. Where to put them is knitter's choice, but generally they look best if the TURNS are straddling the shoulders, so they are not always exactly where you see them in the diagram. The TURNS need to be staggered in an even manner, so that you create a CRESCENT MOON shape of added fabric. Short row wrap turns are executed thusly:
short row wrap =
slip next st, bring working yarn through needles to opposite side of work,
slip st back to left hand needle, put working yarn back to where it started.
Turn work, preparing to work back in the opposite direction, as in flat, back-and-forth knitting.
Here is a common spacing of shaping short row turns:
Row 1: outside: work in pattern to 2 sts before last wrapped st, SRW, turn
Row 2: inside: work in pattern to 2 sts before last wrapped st, SRW, turn.
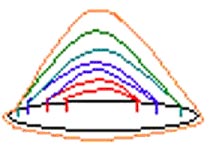
There are a few ways to create a short row neck in the round. This first illustration is a hugely exaggerated depiction of inner to outer. The black oval illustrates the bind off row of the neck. Depending on whether you are working the neck bottom up (Zimmermann style) or top down (Walker style), your short rows are the ENDING of the neck shaping or the BEGINNING and may not be connected at first. Zimmermann style has you starting with the ORANGE line and working to the RED, and Walker style is the reverse, which is what the words below walk you through (pun intended).
Starting at the innermost red line on the left, work across, in pattern, to the innermost red line at the right, execute a short row wrap, TURN. Short row necks are worked in back-and-forth knitting ad NOT in the round, with the short row wrapped stitches marking the turning points. Work across past the initial red-line point, to the next red line on the left , execute a short row wrap, TURN.
Work in pattern to the first blue line on the right, execute a short row wrap, TURN, work across past the initial red/blue line point, to the next blue/green line on the left , execute a short row wrap, TURN.
Work in pattern to the first green line on the right, execute a short row wrap, TURN, work across past the initial blue/green line point, to the next orange/green line on the left, execute a short row wrap, TURN.
Connecting Round: Work around the ENTIRE neck, in the round. Short row back-and-forth knitting is now abandoned. The extra short rows you have worked back and forth will cause the back of the neck to be longer than the front, allowing the neck to sit properly on your shoulders.
Posted by countrywool
at 6:41 AM EDT