BareNeedle
« April 2024 »
S M T W T F S
1 2 3 4 5 6
7 8 9 10 11 12 13
14 15 16 17 18 19 20
21 22 23 24 25 26 27
28 29 30
Entries by Topic
All topics
cables
charity knitting
faroese knitting
gansey knitting
Knitting Retreats
nordic knitting
percentage knitting  «
quick projects
Shop News
stranded knitting
Countrywool Links
Visit the shop!
Blog Tools
Edit your Blog
Build a Blog
RSS Feed
View Profile
Saturday, 15 March 2008
Reversible Percentage Sweaters
Topic: percentage knitting
Knitting reversible stitch patterns was a revelation to me back in the 1980's when I came across Jackie Fee's SWEATER WORKSHOP. But, it is an idea that has stayed with me as I designed my way through a number of items, mostly hooded scarves and shawls. Jackie's Harris Tweed pattern stitch has enchanted me for that long.
So, I've dedicated the past year to playing with it.
 
The Kid's Reversible Sweater (pictured above) is the ultimate in practicality for moms and kids. When your tot dribbles tomato sauce down the front and you still have places to go, just turn it inside out and you're all set.
 
So, that pattern was born.
 
Then came the adult version:

and then, of course, my trademark gauge hat pattern:

These three patterns, along with 6 others, are stage front and center for three knitting retreats this year. We will spend a lot of time discussing sizing for these sweaters, and finishing for a perfect look. Circular knitting lends itself beautifully to these designs and to their subsequent flawless appearance when turned inside out. (Try entering one of these beauties at a county fair and watch the judge's eyes open wide).
 
The first retreats happen late this month & early next month at Cape Ann on the north shore of Massachusetts. The last one takes place in Round Top, NY, on the eastern slopes of the Catskill Mountains of NY the first weekend in November.
(The website should be up and registrations accepted in late April). 

Now that I have been knitting these reversible patterns, my mind is busy constructing some cardigans, for which reversibility is the ultimate in practicality. Stay tuned for more patterns!


Posted by countrywool at 7:26 AM EDT
Post Comment | Permalink
Sunday, 19 August 2007
Sweater Construction: Short Row Necks
Topic: percentage knitting

This morning on the KNITLIST, this subject came up, and once again, I thought it timely to post instructions to budding pattern designers. 

 Let me preface the directions by saying that this uniquely worked neck was first illustrated for me in Elizabeth Zimmermann's KNITTING WITHOUT TEARS . This book opened up a door for me in sweater design, and once going through I have never looked back.

Well fitting necks are lower in the front and higher in the back.  Working circularly knit sweaters has always been a challenge, as the easy way to finish off, or start, a circular sweater generally results in a neck that crowds the chin. Necks are commonly 2-4 inches higher in the back for most adult sweaters....1-2 inches for kids. If you know your row gauge (work a swatch to find it!) you can figure out for yourself how many short rows to add to any sweater pattern for the perfect fit. Where to put them is knitter's choice, but generally they look best if the TURNS are straddling the shoulders, so they are not always exactly where you see them in the diagram. The TURNS need to be staggered in an even manner, so that you create a CRESCENT MOON shape of added fabric. Short row wrap turns are executed thusly:

short row wrap =
slip next st, bring working yarn through needles to opposite side of work,
slip st  back to left hand needle, put working yarn back to where it started.
Turn work, preparing to work back in the opposite direction, as in flat, back-and-forth knitting.

Here is a common spacing of shaping short row turns:
Row 1: outside: work in pattern to 2 sts before last wrapped st, SRW, turn
Row 2: inside: work in pattern to 2 sts before last wrapped st, SRW, turn.

There are a few ways to create a short row neck in the round. This first illustration is a hugely exaggerated depiction of inner to outer.  The black oval illustrates the bind off row of the neck. Depending on whether you are working the neck bottom up (Zimmermann style) or top down (Walker style), your short rows are the ENDING of the neck shaping or the BEGINNING and may not be connected at first.  Zimmermann style has you starting with the ORANGE line and working to the RED, and Walker style is the reverse, which is what the words below walk you through (pun intended).

Starting at the innermost red line on the left, work across, in pattern, to the innermost red line at the right, execute a short row wrap, TURN. Short row necks are worked in back-and-forth knitting ad NOT in the round, with the short row wrapped stitches marking the turning points. Work across past the initial red-line point, to the next red line on the left , execute a short row wrap, TURN.
Work in pattern to the first blue line on the right, execute a short row wrap, TURN, work across past the initial red/blue line point, to the next blue/green line on the left , execute a short row wrap, TURN.
Work in pattern to the first green line on the right, execute a short row wrap, TURN, work across past the initial blue/green line point, to the next orange/green line on the left, execute a short row wrap, TURN.

Connecting Round: Work around the ENTIRE neck, in the round. Short row back-and-forth knitting is now abandoned. The extra short rows you have worked back and forth will cause the back of the neck to be longer than the front, allowing the neck to sit properly on your shoulders.


Posted by countrywool at 6:41 AM EDT
Post Comment | View Comments (2) | Permalink
Friday, 2 February 2007
CIC Sweater #5 (final) - Shoulder decreases, Neck finish and Underarm grafting
Topic: percentage knitting

Hi all! When last we left our sweater, it was in three units: a tube of the body, and two tubes of sleeves. Now we will put them all together on the big circular needle that the body is on.
First we need to find, mark and remove the underarm stitches. These few stitches will later be grafted, kitchenered or simply sewn together.

If you know the number of stitches on the body needle, you can figure out the number needed for the underarm. Elizabeth's Percentage System, or EPS, tells us that 8% of the body stitches becomes the underarm. So, if we had 108 sts on the body from our original example, 8% would be .08 x 108 = 8.64 sts. We can round this to whatever we want, so I'll go down to 8 sts. These underarm sts will be found in 4 places in your knitted tubes, so let's go and find and mark them.

First of all, cut off any yarns attached to the sleeve tubes and the body tube. Leave 8" for darning in later.

It is easier to take 18" pieces of thick wool to use as underarm holders. I also like the two-ended holders that Clover and others make.

At the top of each sleeve tube, find the 4 sts before and the 4 sts after the beginning of the round. Remove ONLY these underarm stitches and put them on a holder. Tie the holder yarns ends together. Make sure you do the same for sleeve #2.

Now, on the body tube, find the 4 sts before and the 4 sts after the beginning of the round. Remove these underarm stitches and put them on a holder. You now have to find the underarm sts that are exactly halfway around the body tube and mark them by running your holder yarn or holder through them. Find them this way:

Figure the body number (108) - 2x the underarm sts (2 x 8 = 16)= 108 - 16 = 92. Now take THAT number and divide by 2. 92/2 = 46. So, in our example, there are 46 body sts for the FRONT and 46 body sts for the BACK.

Tie the holder yarns ends together.  (you do not have to pull them off the needle JUST YET).

At this point you are now ready to knit the sleeve tubes ONTO the body needle. Make sure the sleeve tubes are on needles that you can knit off of.

Find or make 8 ring markers or safety pins big enough to slide over the needle ends. Make sure two of them are the same bold color (and you can use a red yarn tied onto them OR a magic marker to help). Find two huge safety pins or clip-type stitch holders and a darning needle. Settle yourself down with a cup of something and plan to spend close to an hour to do the following:

1. Clip each sleeve to its correct position on the body, matching the underarm sts on holders. Clip through the sleeve just below the stitches on a holder, and through the body at the same point. You might even like to use 2 clips so it doesn't shift while you knit.

2. Lay the sweater down with the sleeves on the right and the left. At the left sleeve spot where it meets the body sts, use your darning needle to darn in the end of a ball of new yarn onto the body side of the join, invisibly on the inside. This allows you to start knitting with a tight stitch. You will start knitting at this point and it becomes the Beginning of the Round (BOR).

3. Get out your two Bright Markers. Slip the last stitch on the body needle (just before the underarm stitches that you marked and removed) to the needle that is holding the sleeve sts. Place a Bright Marker on the needle that is holding the body sts. With the yarn you darned in, K2 sts TOG (knit two stitches together) from the needle that the sleeve stitches are on. Place another Bright Marker. The stitch you just knit is the BOR.

4. Knit all sts of the sleeve ONTO the body needle, but stop just before the last stitch of the sleeve. Place a marker. Slip the last st of the sleeve onto the body needle.  K2 sts TOG. Place a marker. The first (left) sleeve needle should now be empty and put it aside.

5. Knit across the FRONT of the body to 1 stitch before the underarm sts on a holder. Place a marker. Slip 1 stitch to get access to the underarm stitches that are sitting on the body needle. Slide them carefully off the body needle. Slide the slipped stitch on the body needle to the sleeve needle. K2 sts TOG. Place a marker. Knit all sts of the right sleeve ONTO the body needle, but stop just before the last stitch of the sleeve. Place a marker. Slip the last st of the sleeve onto the body needle. K2 sts TOG. Place a marker. The second (right) sleeve needle should now be empty and put it aside.

6. Knit across the BACK of the body until you bump into the BOR marker.

Your sweater is joined! Knit 2 rounds.

SHOULDER DECREASE
You now have a LOT of stitches together on the big circular needle.

The job now is to gradually and graceful reduce the number of sts to just those needed for the neck opening, and create the top of the sweater. The shaping we will do is called raglan.

To figure out how deep to make the shoulder area, we simply duplicate the measurement we figured for the top of the sleeve. In this case, it was 8" across. So, we'll make the top of the sweater or the shoulder area 8" deep.

The first thing we need to do is to count how many rounds will make 8". So, take out the sweater body and lay it as flat as you can to find a spot where you can measure 8" high. Do not measure where the ribbing edge sts are, but start an inch above them. Get out 2 pins and a ruler and a big sheet of paper (which will be where you write down the shoulder instructions). Put the ruler on the body of the sweater the LONG way from bottom to top, with the "0" end one inch above the ribbing and put a pin there. Now, at 8", put another pin. Take the ruler away. Find some good light and using the point of a needle, carefully count the rounds between both points. Each round  is one "V", or an upside down "V". Write down the number of rounds you count. That is YOUR magic shoulder number.

Raglan shoulder shaping is accomplished by inserting just enough decrease rounds in the knitting to get to the number of sts you need for the neck. Each decrease round gets rid of 8 sts. So, here's some math and an example.

Let's say that our 108 stitch sweater is measuring  32 rounds for 8 inches. We will need to knit a TOTAL of 32 rounds for the shoulder area, including any neckband we will add last. Let's figure the neckband will be 4 rounds of ribbing, so our shoulder area will be 28 rounds TOTAL.

Write down on your piece of paper, from top to bottom, Rounds 1-32. On round 1, write JOIN, and mark it off as done (we already did that). On round 2 write KNIT EVENLY AROUND, and we already did that, too, so mark that off. Leave Rounds 3-28 blank for now. On rounds 29-32, write RIBBING. If YOUR magic number is not 32, adjust the directions below to reflect that, leaving the last 4-6 rounds for ribbing: (you want about an inch of ribbing)

Now the fun begins.

The number of sts on the top of your sleeve is also the same number of sts for the neck! Is that cool, or not? So, find that number. In our example, that would be 48 sts.

Raglan decrease rounds gobble up 8 sts every time you work them. We know we have to get from all the sts on our needle down to 48. So count the sts on your needle. Our example has 164 sts. 164-48 (what we leave on for the neck)= 116 sts to get rid of.

Let's see how close to perfect our raglan decreasing can get us. 116/8 = 14.5. Let's round it down to 14. We have to work a decrease round 14 times between now and the last 4 rounds before the neck.

So, here's what my shoulder instruction paper looks like:

1. Join

2. Knit around

3.

4.

5.

6.

7.

8.

9.

10.

11.

12.

13.

14.

15.

16.

17.

18.

19.

20.

21.

22.

23.

24.

25.

26.

27.

28.

29. rib

30. rib

31. rib

32. rib

If I count all the shoulder rounds left, I have 26 to work with. 14 of them will be decrease rounds. They cannot be all evenly spaced, but that is not a problem with circular knitting! The rule here is to have them wider apart when you start, and closer together at the neck. So, start putting them in every other round starting with round 3, and as you get close to the neck round, put them on every round. I use a pencil to put them in, so I do not have to bother with math at this point, and simply erase what doesn't fit (better than ripping out later!).

So my shoulder direction paper now looks like this:

1. Join

2. Knit around

3. D (means decrease round)

4.

5.D

6.

7.D

8. (as you have fewer stitches, you might need to use larger 16" circular needle to have them fit)

9.D

10.

11.D

12.

13.D

14.

15.D

16.

17.D

18.

19.D

20.

21.D

22.

23.D

24.

25.D

26.

27.D

28.D

29. (change to smaller sized 16" circular needle) rib

30. rib

31. rib

32. rib

Proceed knitting, with your DECREASE rounds worked this way:

 KEY:

K=knit

K2TOG= knit 2 stitches together as one (decrease)

SSK= slip first stitch as if to knit, slip second stitch as if to purl, put point of left needle on front of both those sts and K2TOG (decrease)

RAGLAN DECREASE (this is worked 4 times total each decrease round):

*slip marker, knit stitch between markers, slip marker, K2TOG, K across to 2 stitches before next marker, SSK*    repeat from * to * 3 times more.

NECK BIND OFF INSTRUCTIONS: I recommend a SEWN OFF BIND OFF to allow for maximum stretch.

SEWN OFF BIND OFF:

Cut yarn leaving 4x the measure around the stitches on the needle. Thread end through darning needle. Cast off as follows: *Darning needle goes through 2 sts as if to purl. Leave sts on needle. Darning needle goes through first st AGAIN, but as if to knit and then that st is dropped off needle*  Repeat * * until all sts have been cast off.  Sew yarn to first st.

 For Frannie:

If you have more sts than the example did,that is NO PROBLEM! That means you will need to do a few more decrease rounds before you reach the neck.

You have 168 sts and your neck needs to be 48 sts.

168-48 = 120. And divide the increases (8 per round) into the number to get rid of: 120/8=15. If you make 15 rounds of decrease, you will arrive at EXACTLY the neck number needed. So, the answer to  your question is YES...add in one more round of decrease on your shoulder instruction list  CLOSE TO THE NECK. Looks like round 26 will ALSO be a decrease round for you.

FINISHING:

Your circular raglan sweater should be completed to the neck, and bound off with a sewn off bind off. You are left with stitches on holders at each underarm and a yarn end or two (or 7) all over the sweater to darn in.

 Darn in those wild ends first. Get them out of the way.

Tackle the underarms, one at a time.

 First, get out a darning needle. Look at the yarn ends that are attached to the underarm stitches. Cut them all to 6”. Resist the temptation to use of them to sew the underarms WHILE IT IS ATTACHED.

Lay your sweater out with the underarm stitches facing each other like this (second picture down).

Thread a 24” [piece of yarn through a darning needle. Leaving a 6” end, start sewing the bottom and top stitches together, while on the needles, from right to left, like this:

GRAFTING or Kitchener Stitch or Weaving

        On front needle:

        1. Pass tapestry needle through as if to knit, drop st off needle

        2. Pass tapestry needle through as if to purl, leave st on needle

        On back needle:

        1. Pass tapestry needle through as if to purl, drop st off needle

        2. Pass tapestry needle through as if to knit, leave st on needle

      That's it.  Just remember to keep the tension loose.

When you finish grafting across, you will need to do a little magic to weave in and hide your end and secure the triangular area of knitting that greets you.

Do the same where you started.

You are done! I would love to see pictures of what you have made J

Claudia at Countrywool

Circular Knitting Techniques Retreat in the Catskill Mountains of NY

May 18, 19 and 20, 2007


Posted by countrywool at 8:09 AM EST
Updated: Friday, 2 February 2007 8:13 AM EST
Post Comment | Permalink
Wednesday, 24 January 2007
CIC Sweater #4...Joining the body and sleeves
Topic: percentage knitting

Hi all! When last we left our sweater, it was in three units: a tube of the body, and two tubes of sleeves. Now we will put them all together on the big circular needle that the body is on. 

First we need to find, mark and remove the underarm stitches. These few stitches will later be grafted, kitchenered or simply sewn together. 

If you know the number of stitches on the body needle, you can figure out the number needed for the underarm. Elizabeth's Percentage System, or EPS, tells us that 8% of the body stitches becomes the underarm. So, if we had 108 sts on the body from our original example, 8% would be .08 x 108 = 8.64 sts. We can round this to whatever we want, so I'll go down to 8 sts. These underarm sts will be found in 4 places in your knitted tubes, so let's go and find and mark them. 

First of all, cut off any yarns attached to the sleeve tubes and the body tube. Leave 8" for darning in later. 

It is easier to take 18" pieces of thick wool to use as underarm holders. I also like the two-ended holders that Clover and others make. 

At the top of each sleeve tube, find the 4 sts before and the 4 sts after the beginning of the round. Remove ONLY these underarm stitches and put them on a holder. Tie the holder yarns ends together. Make sure you do the same for sleeve #2. 

Now, on the body tube, find the 4 sts before and the 4 sts after the beginning of the round. Remove these underarm stitches and put them on a holder. You now have to find the underarm sts that are exactly halfway around the body tube and mark them by running your holder yarn or holder through them. Find them this way:

Figure the body number (108) - 2x the underarm sts (2 x 8 = 16)= 108 - 16 = 92. Now take THAT number and divide by 2. 92/2 = 46. So, in our example, there are 46 body sts for the FRONT and 46 body sts for the BACK. 

Tie the holder yarns ends together.  (you do not have to pull them off the needle JUST YET).

At this point you are now ready to knit the sleeve tubes ONTO the body needle. Make sure the sleeve tubes are on needles that you can knit off of. 

Find or make 8 ring markers or safety pins big enough to slide over the needle ends. Make sure two of them are the same bold color (and you can use a red yarn tied onto them OR a magic marker to help). Find two huge safety pins or clip-type stitch holders and a darning needle. Settle yourself down with a cup of something and plan to spend close to an hour to do the following: 

1. Clip each sleeve to its correct position on the body, matching the underarm sts on holders. Clip through the sleeve just below the stitches on a holder, and through the body at the same point. You might even like to use 2 clips so it doesn't shift while you knit. 

2. Lay the sweater down with the sleeves on the right and the left. At the left sleeve spot where it meets the body sts, use your darning needle to darn in the end of a ball of new yarn onto the body side of the join, invisibly on the inside. This allows you to start knitting with a tight stitch. You will start knitting at this point and it becomes the Beginning of the Round (BOR). 

3. Get out your two Bright Markers. Slip the last stitch on the body needle (just before the underarm stitches that you marked and removed) to the needle that is holding the sleeve sts. Place a Bright Marker on the needle that is holding the body sts. With the yarn you darned in, K2 sts TOG (knit two stitches together) from the needle that the sleeve stitches are on. Place another Bright Marker. The stitch you just knit is the BOR. 

4. Knit all sts of the sleeve ONTO the body needle, but stop just before the last stitch of the sleeve. Place a marker. Slip the last st of the sleeve onto the body needle.  K2 sts TOG. Place a marker. The first (left) sleeve needle should now be empty and put it aside. 

5. Knit across the FRONT of the body to 1 stitch before the underarm sts on a holder. Place a marker. Slip 1 stitch to get access to the underarm stitches that are sitting on the body needle. Slide them carefully off the body needle. Slide the slipped stitch on the body needle to the sleeve needle. K2 sts TOG. Place a marker. Knit all sts of the right sleeve ONTO the body needle, but stop just before the last stitch of the sleeve. Place a marker. Slip the last st of the sleeve onto the body needle. K2 sts TOG. Place a marker. The second (right) sleeve needle should now be empty and put it aside. 

6. Knit across the BACK of the body until you bump into the BOR marker. 

Your sweater is joined! Knit 2 rounds and the next set of directions will arrive on Thursday morning.


Posted by countrywool at 10:35 AM EST
Post Comment | View Comments (1) | Permalink
Monday, 15 January 2007
CIC Sweater.#3...The Body
Topic: percentage knitting
Hi all. 
My sympathies to Amy, who's fingers are sore. I suspect you are a tighter-type 
knitter?  I have been watching the chat about this on another list and some 
wonderful tips have been  forthcoming. I will pass them on.
 
Those of us knitting with charity donated wools seem to end up with the 
scratchiest wools. One suggestion is to skein the wool and wash it FIRST, 
soaking in fabric conditioner to soften the wool fibers. This works very well. 
It seems that  continental/german (picker) style knitters are having more trouble 
with this than english/american  style(thrower)knitters. The best suggestion I 
have seen, beside the band aids which do work, is to cover your sore finger 
with the cut off finger of a leather or some other type smooth fabric glove. I 
would love to hear from others on  this!
Now, back to our Sweater Knit-A-Long...
 
THE SWEATER BODY PLAN
When last we left things, both sleeves were done. If you are making a 36" 
finished chest measurement, a teen size 16, 16 - 16.5" is a good length. 
Now the important thing is to check your knitting gauge FROM THE SLEEVE. 
If anyone has trouble with this, please send a note and I'll be glad to help (I am 
on digest, so if you  want an answer today, e-mail me directly). 
If your knitting gauge is 3 stitches = 1", you'll need 36 x 3 or 108 stitches for the body. 
If your knitting gauge is 3.25 stitches = 1", then 3.25 x 36 = 117 stitches. Let's say 118 stitches.
If your knitting gauge is 3.5 stitches = 1", then 3.5 x 36 = 126 stitches  
If your knitting gauge is 3.75 stitches = 1", then 3.75 x 36 = 135 stitches. Let's say 136 stitches.
If your knitting gauge is 4 stitches = 1", then 4 x 36 = 144 stitches 
If your knitting gauge is 4.25 stitches = 1", then 4.25 x 36 = 153 stitches. Let's say 154 stitches.
If your knitting gauge is 4.5 stitches = 1", then 4.5 x 36 = 162 stitches 
You can see how this is done. If you have a gauge not here and can't figure, 
just e-mail me. Your ribbing needs to pull in somewhat, so cast on that number 
of stitches on your SMALLER 24-36" circular needle. Work in *K1, P1* 
ribbing stitch for about 2-3 " (knitter's choice!) and then simply switch to using 
the LARGER 24-36" circular needle, by KNITTING off the stitches from the 
smaller needle. Continue to work in plain 'ole knit stitch from now on. Knit the 
body, around and around, until you reach a BODY LENGTH that matches 
what we need for our size. If you stand and let your fingertips fall to your side, 
they reach below your hip. A sweater that long should be knit to your sleeve 
length PLUS 6". I doubt our teens need that length, but it is an option if you so 
choose. How about adding 2" to the sleeve length measurement? So, knit 
around until the body length, measured from THE CAST ON EDGE, is 18-18.5".
I hope to hear how you are all doing! Holler with any questions.

Posted by countrywool at 1:43 PM EST
Updated: Monday, 15 January 2007 1:52 PM EST
Post Comment | Permalink
Wednesday, 10 January 2007
CIC Sweater...#2
Topic: percentage knitting

January 8, 2007

Kudos to Sarah and DJ and Jean for keeping Frannie going yesterday. Loved the Internet links you sent for using two-circs to knit in the round. Glad that your knitting is going fast, Frannie, with two strands of worsted. So, what is your gauge on the one sleeve that got done to 52 stitches and 13"? 

Once we get the info all gathered for the project, I can give it its own website or we can put it in the CIC files. 

Tonight the local Neighborhood Knitters will meet for the first time this year. I plan to drag them into this project. Keep your questions coming!


January 10, 2007

 To answer your question, the Circular Sweater Knit-A-Long is sort of a blind-faith affair...we are starting with the sleeves to see how we go, and eventually will make a pullover sweater that measures ABOUT 36" around to fit a teen size 16. The Sweater Percentage System of Elizabeth Zimmermann (EPS) is the backbone of the math we are using.

Cheryl had a question about the sleeve length, and we will tackle that issue now.

 SLEEVE LENGTH

All of you knitting along have done your increases and gotten your sleeves to 8" across or 16" around, which are sleeve/shoulder depth numbers that generally fit a small adult. Making a teen sweater size 16 requires that we figure out how long the "standard" sleeve for this size might be. A lovely aid to all this is the handy chart here:

We can follow the size 16 measurements and see that a sleeve length of 16.5" is average for this size, so we will knit our sleeves to this length. If you want to go shorter because you feel your sleeve is narrower than you want OR go longer because your sleeve is wider than you want, that is fine. Just keep good notes about what you are doing. You will end up making a size smaller or larger than we are aiming at, but all the kids are not the same size (!) so it's all good. The biggest issue is to keep it in proportion so the final sweater is useable. 

Now, transfer the stitches after one sleeve is done so you can start sleeve #2. I like to put them on another circular needle of any length, that is smaller than the size they were knit on.This keeps them handy for joining later on, and keeps them from getting stretched out while waiting. You can also use double pointed needles for this purpose, just be sure to secure the ends with point protectors OR rubber bands wrapped around many times, so your stitches stay put while waiting. 

A note to those of you who have not started yet.  If you are using yarns significantly smaller than 2 worsted weight strands held together, or if you knit tightly, you can start the cuffs with more stitches. The Neighborhood Knitters last night were aiming towards 34 stitches on the cuff, increasing to 40 stitches at the base of the sleeve, and increasing every inch until they had their 16" around. I saw two sleeves done this way and they are fine, just bigger at the cuff. What happens with this knit sleeve, is that all the increases are finished before you reach the elbow length, and you are left to knit all the stitches evenly around until you reach the sleeve length. This is fine! 

 Any questions? 


Posted by countrywool at 8:02 AM EST
Updated: Wednesday, 10 January 2007 8:15 AM EST
Post Comment | Permalink
Monday, 8 January 2007
January Sweater Knit A Long for Children In Common
Topic: percentage knitting

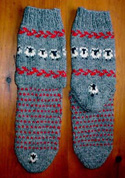
The Christmas Knitting got done and gifted so quickly and at the last minute, that picture taking did not happen. Now that the New Year is behind me, I am embroiled in my least favorite part of owning a yarn shop: inventory and bookkeeping. Trust me that January has become a very unfavorite month.

I do not allow myself to create anything new on my needles until the bookwork is all done. This is a discipline to keep me from diverting myself. However, I am bored with my life this way, so I continue to come up with something entertaining.

The CIC list is having a monthly Knit A Sweater For Bigger Kids in the orphanages of Russia. I am hosting a Percentage Knit-A-Long for a 36" sweater. It is great fun and I am very diverted by 30 minutes each morning as I answer the burning questions of the day from them. It's all good.

I have decided to include all the posts here to have an easy reference place should they have questions. Below is Week 1.

Jan 3, 2007:Good morning everyone!

In light of our new project for this new year, I had an idea. Actually, two ideas. One was to
create a sweater pattern that uses up odd colors and weights of yarn, and the next was to make
it a circular knit project so it would go faster.

Elizabeth made an excellent point about finished sweaters and vests not fitting over the victim's
head. Unfortunately, we do not get to see them when they are tried on. SO, I will add an offer
of my time to help anyone with any neck finish so
we can be sure the neck will be big enough. The easiest way to rectify this is to use a SEWN OFF
BIND OFF, which is worked with the end yarn and a darning needle. If anyone would like me to
post it right now, just holler. I am hoping to add it to the FILES section if it isn't there
already. In fact, it might be an idea to come up with a BEFORE YOU SEND YOUR BOX list of things
to check for?

At any rate, a circular knit sweater is a mystery to some knitters, but as soon as they do one,
the light bulb comes on. It's nice to know that when the knitting is done, there is only 20 more
minutes of finishing. I teach this technique all the time and it would be delightful to do so
here if anyone is interested. At the same time, it is wonderful to use up what you have AND make
an interesting sweater.

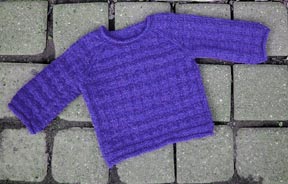
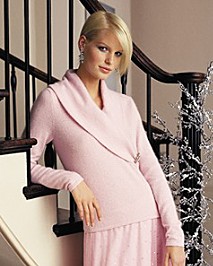
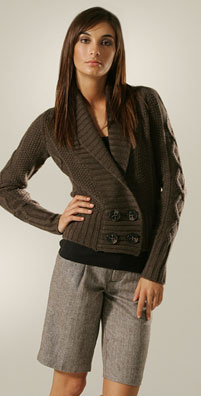
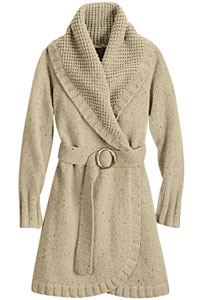
The age group we are knitting for this month will be varied, and I would tend to make all sweaters
for the teens in neutral colors. Those browns and grays and greens that gather dust in your closet
would be very wearable for a 14 year old boy. That is THE most requested item from the
teenagers who come into my shop...neutral color.

Most people have knitting worsted weight yarns in their stash (4 oz/100 gram and 190 - 220 yards
per skein). I would think that 800 yards of ONE color (4 skeins) knit together with 800 yards of
another or a combination of colors would create a great sweater. Working with two strands allows
for unique color combinations and quick knitting. I think #8 and #10 needles would work pretty
well with that final yarn weight. The idea is to aim for a 36" chest. The yarns weights and your
knitting gauge will determine the final outcome, so there are lots of ways to adjust the final
sweater AS IT IS BEING KNIT so it will turn out well proportioned for its size.

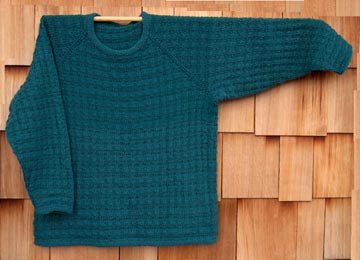
Another idea for color combinations...It takes a tad more than half the final yarn used to make
the body up to the underarms + 2 sleeves of a circular knit sweater. At that point, one can
change the base color OR the knit-along color and have the top/shoulders/neck slightly different.

Anyone up for this plan?

January 4, 2007

Cynthia, the neck info is posted below. Hope it is helpful. Your sweater amounts sound just fine.
Might I suggest something? Stripes are a PITA to weave yarn ends in, and there is a "jog" at each
color join with circular knitting that requires a fix that is sometimes not very good looking.
How about stranding your beige WITH your dark color and make a ragg yarn color? Very good looking
when knit, IMO. I am hoping that before everyone ships off their sweaters, we can get photos on
our site.

Carol, welcome aboard!!!

As Emm pointed out, Elizabeth Zimmermann was a trail blazer with her sweater percentage method,
and that is what I use to plot sweater numbers. The nice thing about starting with the sleeves,
is that it becomes the gauge swatch (!) and you plot the whole sweater based on how you are
knitting. Nice to do what you are already doing with the needles and yarn you have on hand, huh?

NECK BIND OFF THAT STRETCHES. When you make a knit bind off, or a knit/purl bind off in
pattern, even using a larger needle does not always guarantee that the edge will stretch,
although it makes the edge BIGGER. The secret to well fitting necks is:
1. the number of sts on the neck are sufficient to open to 20-24 inches (the size of most
preschooler-adult heads)
2. The edge sts have extra yarn built into them to allow for expansion.
the "bind off with larger needle" technique does work most of the time, BUT it does not relax
after being stretched. The necks on these sweaters, if really too small to begin with for
the sweater or the recipient, look bad after a few wearings.

First of all, to plot the numbers for the neck on ANY sweater you are making, and make sure they
equal 40-50% of the total number of sts AROUND the whole sweater. For instance, if a sweater has
50 sts on the front, and 50 on the back, that is 100 all together. 45% would be 40 sts, and 50%
would be 50 sts. So, somewhere between those two numbers is a safe zone, depending on the size of
the sweater.

Elizabeth Zimmermann found that babies and toddlers need 50% necks to get pullover sweaters
over their heads. Some adults like big necks, too, that don't bind or pull on their
ears/glasses when hey haul the sweater on. Adults who are using the sweater to keep warm
enjoy 40-45% necks, so that would make our example sweater neck need 40-45 sts.

A really great neck finish that is easy and fast is a neck roll. With a 16" circular needle,
pick up ALL the sts/spaces/holes (too many is better looking!) around the top of a sweater and
get ready to join the sts together as you start the 2nd round. Count what you have, plot what you
need, and decrease in the first round to the number you need. Knit around for 3-4" and bind
off with a sewn off bind off as follows:

SEWN OFF BIND OFF:
Cut yarn leaving 4x the measure around the stitches on the needle. Thread end through
darning needle. Cast off as follows: *Darning needle goes through 2 sts as if to purl.
Leave sts on needle. Darning needle goes through first st AGAIN, but as if to knit and then that
st is dropped off needle* Repeat * * until all sts have been cast off. Sew yarn to first st.

Happy Knitting!

January 5, 2007

Hi all. Looks like we have a crew onboard this project already! I am excited. I find
Knit-A-Longs to be a GREAT way to get something done and learn new stuff along the way.

Marie was so helpful to Cheryl Beth, and everything she said is right on. Our game plan for
this sweater will use samller needles for the ribbings and larger needles for the sweater.

I want to let everyone know right now that you can use WHATEVER SIZED needles you already own.
Do you have 7 and 9? How about 9 and 10 1/2? Pick two sizes apart that you have in your stash,
or can get easily.

Needle lengths:
1. You'll need double pointed and 16", 24" circular smaller needles
AND
2. 16" and 24" larger needles

Thst's the most common assortment you can use. THEN there is an alternative, which some of you
mentioned, and that is two circular needles of ANY length, in both sizes. These can do the
smaller cuffs and arms as well as the body and the neck.

Then there's a radical approach, but is the most economical if you are buying new needles (and we
all like to buy new needles!). Get 2 circular needles, in 40" or longer length, one small size
and one larger size. These can be used for MAGIC LOOP knitting, which I will be glad to explain
tomorrow, or perhaps someone here has the website address handy and can point folks there.

At any rate, with whatever needles and yarn (2 strands of worsted held together works well with
#8 and then #10 needles) you have, let's start the CUFFS as follows:
With your smaller double pointed needles, or your smaller circular needles, cast on 24 sts, JOIN
YOUR WORK, and work in *K1,P1* ribbing for 2". Place a marker, knit one, place another marker
(denotes the beginning of the round AND a center stitch). THEN, using your larger needles, and in
knit stitch only, INCREASE 6 sts evenly in the next round (which is 1 new stitch made after
every 4 sts knit), or *K4, inc* repeating around, ending K3, inc.

SLEEVES:
Knit for one inch. Make a new stitch on either side of the center stitch. *Knit for one more
inch. Make a new stitch on either side of the center stitch.* Repeat the directions from *to*
up the sleeve until you can measure 16" around the sleeve, and we'll talk more about that
tomorrow.

January 6, 2007

Hi Cheryl Beth and Marie

You guys are in danger of getting bogged down. Chill!!!!

One of the nicest things about "winging" a pattern is that it can give you tremendous leeway
when choosing your materials. So I am about to make a wild statement...use any needles you have
with any yarn you have and make a gauge swatch, such as you did Cheryl Beth, and just see what
the fabric looks like. Do you like it? Is it soft/firm enough? If you are not happy, change
the yarns or change the needle size until you get what you like to feel in your hands and can
imagine as a warm sweater on someone. We will, together, write the pattern numbers, based on a
nice gauge swatch. This will result in a sweater that will be wonderfully proportioned and work
well.

I am suggesting a 36" chest, but we/you can easily make bigger or smaller sweaters with this
method. So, if you feel you want to make a 40" chest, or a 32" chest, it's no big deal.

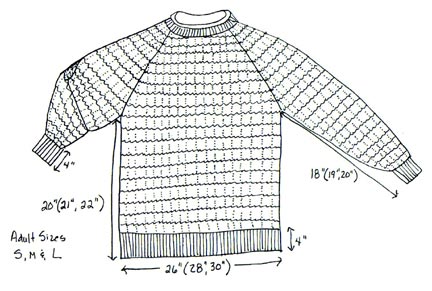
The cuff stitch number is based on a bulky yarn and big knitting gauge of 3 sts=1" with a 36"
finished chest measurement, which will fit someone with a 32" chest. Here is a chart of
children's sizes showing the sizes of parts of garments. Older kids sizes are there and we will
aim for the size 16 in our pattern. IF YOU WANT TO AIM FOR ANOTHER SIZE THAT IS FINE! Just ask
about tweaking your numbers and I'll be happy fill in any blanks:
http://www.yarnstandards.com/childsize.html

Way back in knitting history, knitters did not have the luxury of patterns and every needle size
imaginable to work with. Because they had to be creative and flexible, they managed to make
garments to fit without all the tools we have today. And they did. Which means you can, too.

Years ago I wrote a 44" sweater pattern for the Internet. It was for my (now 21 year old)
daughter. Bestsi's Raglan Sweater is posted on my website for all to use. You can read all the
way through the process to see how it goes:
https://countrywool.tripod.com/freepatterns/betsirag.htm

And do not be fearful about this method. Once you get all the way through it, you will better
understand circular sweater construction. You will start 2007 off with a new knitting skill and
the orphans will have another sweater!

January 7, 2007

Hi all

Welcome to the newest Knit-Along members!

Jessica asks if this is knit in the round. YES, indeed! This pretty much eliminates finishing,
 so the sweater gets done sooner.

Kelly wants to know the advantage of bottom up or top down construction. It's good either way.
I generally make my designs bottom up, as it is easier to figure the percentages. I also find
that decreases look better than increases, which makes the shoulder area construction tidier to
look at. Finally, cast off edges can be a problem for a newer knitter. Casting off the hem edge
at the bottom for a top-down knit never looks right the first time you do it and tends to flair.
It is much easier (and faster) to work a sewn-off bind off around the neck of a bottom-up knit
sweater for a professional looking edge.

And Sharon, I think that apricot and brown knit together would make a WONDERFUL marled yarn
ragg-look sweater! I believe 800 yards of each color in a worsted-type weight yarn should be
enough if knit together.
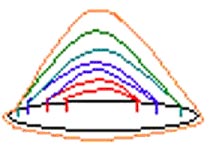
SLEEVES:
When last we left the sweater construction, we were making sleeves in the round. The intent was
to add increases every inch, two at a time, until the sleeve measured 16" around or 8" across.
Measuring this while on the needle can be daunting, so here is a tip:
Take the time to carefully measure the gauge you are knitting at once you get 6 inches past the
cuff. Take a flat ruler and lay it against the knitting 2" below the needle. Find the "0" and "4"
on your ruler and place a straight pin IN the knitting at those two points. Take the ruler away,
find excellent light and take some time to count the stitches between the pins. Each stitch
consists of 2 slanted sides that meet either at the top OR the bottom, depending on which slant
you start counting with. Make sure you count any half or quarter stitches you are looking at on
the edge of your carefully marked 4". A half stitch would be a full slant without an opposite
partner, and a quarter stitch would be half a slant. Take this number of sts and divide it by 4.
If you have 13.25 sts in your 4", then your gauge is 13.25/4=3.3 sts. Yes, it looks messy at
this point, but it is only math and makes the final sweater measurement accurate.

So find your gauge on the sleeves and multiply it by the 16" you need..3.3 x 16 = 52.8 sts.
At this point you can round it to 52 or 54, whatever makes you happier.

So, you need to keep increasing on the sleeve in our example sweater with a 3.3 sts=1" gauge
until you have 52(54) sts.

Is anyone having trouble with this? I will be happy to help.


Posted by countrywool at 7:31 AM EST
Post Comment | Permalink
Friday, 22 September 2006
Back in the (pattern writing) saddle, again
Topic: percentage knitting

 Three weeks will see the first Countrywool Sock Weekend. This winter will see the first Countrywool Sock Weekend Retreat. I am up to my ears in editing sock patterns for teaching. I hope that all knitters who attend these gatherings will come away with a clear understanding of 3 distinct and different ways to make socks. A bonus at these retreat/weekend gatherings are the new knitting skills knitters add to their repertoires: Figure 8 Cast On; Twisted German Cast on; sewn down Cast Off; long circular seamless sock magic loop knitting, etc. These weekends will be jam packed with new and exciting ways to enjoy making the mundane yet much beloved sock. 

As I try to be as exact as I can about detailed instructions for those moments when they will NOT be at the weekend and can ask questions, I know there will be stupid errors in any pattern I write. I agonize over how to eliminate as many of them as I can, so that knitters can enjoy the pleasure of working continuously and with great success through my directions. This is the cry of any pattern writer, and she is dependent upon expert knitters/pattern testers to proof knit her directions. I am lucky that many of my knitting friends will check out my directions for goofs and typos, and I always include a phone number/e-mail on the finished pattern so knitters can get to me right away with any question.

But, I am continually amazed at how helpful a spreadsheet can be when working up the particulars for any set of directions. I have been using Microsoft EXCEL for 2 years now, and every time I go back to it to check on sizing variations, I am again grateful that it can be so helpful so quickly. I cannot tell you how often my Algebra skills have come into play as I work out unique pattern formulas, and then EXCEL will just convert all 12 sizes in an instant. 

This is true magic.  

The Peace Fleece Socks pattern will have a Figure 8 Cast On, worked on one long circular needle in the magic loop style, with a Peasant Heel and Sewn Off Bind Off. It will fit feet 5" around to 12" around. And if I am really lucky, EXCEL caught all the inequities in the pattern process.

 I am toying with organizing a Pattern Writing Retreat at Countrywool. Anyone interested? Let me know.


Posted by countrywool at 10:33 PM EDT
Updated: Thursday, 26 October 2006 9:20 AM EDT
Post Comment | View Comments (2) | Permalink
Tuesday, 5 September 2006
A new sweater on the horizon
Topic: percentage knitting

Just when my knitting was getting organized and manageable, along comes another request from Betsi for a sweater I don't normally design for: a cardigan. But a FABULOUS yarn is now in stock here and it would be terrific for what she has in mind, so I am tackling it. 

The yarn in question is Venezia, a lovely, wear-next-to-your-skin merino wool and silk bulky yarn that is crying to become a soft cabled sweater. The color she picked is medium navy blue. 

She has plans for a unique shape that would include an offset single clasped center with a deep shawl collar, along with flared sleeves. I have found a few shapes that are close to what she wants: 

...this pink one has the wrong sleeves and no cables, and is too short, but the body shape and closure line is good.


...this brown one has the cabled look I want, although the rest is not good.


...this natural colored one has the right shawl depth.


So, my job is to put all three ideas together in a sweater. Sounds easy enough. Stay tuned. I plan to write this pattern on the blog so it will be free for all. (And it may end up BEING a free-for-all!)

Next post: cabled gauge swatches that make a knitters' heart sing. 


Posted by countrywool at 1:35 PM EDT
Updated: Tuesday, 5 September 2006 1:37 PM EDT
Post Comment | View Comments (3) | Permalink
Thursday, 13 October 2005
The Block Stitch Tunic Sweater
Topic: percentage knitting
I am packing for Rhinebeck Sheep and Wool this weekend, and with the weather taking a turn, wardrobe evaluation became necessary.


One of the first sweaters I ever designed, knit, and am still wearing, is the Tunic Sweater. (Pardon the lack of a picture...need to get one taken). Back in the late 70's, sweaters all of a sudden became HUGE, and patterns for them were few and far between. The whole oversized movement took off, and I envisioned a sweater to wear with leggings. Knit, of course, in the round, in some lovely pattern stitch that was attractive, not boring to knit, and interesting to look at once on a body. I made one in Lamb's Pride Worsted Loden and there has not been a winter since when it did not become a staple in my wardrobe. I made another in Charcoal Heather, and then Clematis. Fabulous.

Yesterday, the third day of dreary and increasingly chilly rain, saw me reaching for it with black leggings, along with a pair of Sheepy Socks:


I spent the day in my wool clogs, all dressed in wool, and was cheerful and toasty for the first time in a week.

I love wool.

At any rate, it occurred to me I need to make another of these sweaters in something a little lighter in weight. So, I wound a skein of Mountain Goat and off I will go on that mission.

I have been a spinning fool since the Fall Rip Van Winkle Spinning Retreat, but now that I have organized the one for next spring, I've decided to put spinning aside for a few weeks and work on my knitting. But first, I needed to organize all my knitting stuff. I dragged a cabinet to my knitting spot last evening and spent time collecting all needles, notebooks, tools and such into the area. (This was not a small job, and the first thing that had to go was my Norman Hall wheel (sob)).


Posted by countrywool at 8:15 AM EDT
Updated: Thursday, 13 October 2005 8:20 AM EDT
Post Comment | View Comments (1) | Permalink

Newer | Latest | Older