Here's what you'll need.... for a US size 6 (28 inch/70 cm chest circumference);
24" circular #6 or #7 needle
16" circular OR straights #5 (ribbing)
16" circular to match 24" size (sleeves and neck)
a set of double points to match ribbing needle (cuff)
I am using BROWN SHEEP SUPERWASH WORSTED in Purple Haze. I have put 300 grams aside. Knitting gauge is 5 sts=1", so any yarn/neeedle combination that will give you that gauge is usable for this project.
The books at countrywool I am using for reference:
Books available at Countrywool
Knitting Ganseys-- B Brown-Reinsel (this is THE BIBLE!!!!!!!!!!)
Sweater Workshop: 2nd Edition -- J Fee
Knitting In The Old Way -- P Gibson-Roberts (back in print!)
The Knitters Guide To Sweater Design -- C Michelson and M Davis (out of print)
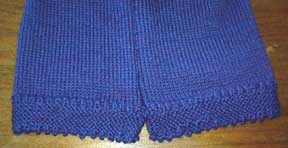
The welt edges will have Channel Island cast on, and here are directions I wrote for that.
JR's Gansey -2- Body Plan, Cast on and Welts
Good morning and Happy September! What a great month to start a sweater.
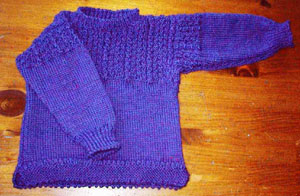
A gansey sweater has a few details that are foreign to some knitters, so I will explain a bit. It starts with a welt, and in this case, a split welt. This we will work in garter stitch in 2 pieces which will be joined to work in the round as we start the body. We will incorporate 2 "fake" side seam stitches at each side, which become the outline of the gusset, which is a diamond shaped piece of knitting that we create at the underarm area, to allow for more shoulder movement. As we reach the underarm area, we will separate the knitting into a front and a back, and work them separately to the shoulders. The front will have a shaped neck scoop. The shoulders will be bound off together in a neat 3 needle bind off. The armhole and gusset stitches are then picked up on a circular needle, joined and worked down to the cuff.
OK. So, let's crunch some numbers and cast on!
I need this sweater to be about 28" around, and my stitch gauge is 5sts=1". This tells me I need 5x28 = 140 sts for the body. BUT, welts knit in garter stitch tend to "flare" so I will work them on 10% fewer sts AND on a smaller needle. 140 - 10% =126 sts. So, I will use #4 and #6 needles (you may use any combination of sizes that give you the correct gauge). My cast on will be 63 sts each for the welts.
Channel Island cast on produces a nice firm picot edge and is used traditionally for welts, so we will start our sweater with this cast on. But wait! Worked by following the directions below, you will end up with an odd number of sts, and that is fine. So, we will cast on 63 for the front and work garter stitch for 10 rows (5 ridges). Leave these sts on a circular needle, and work the other welt the same.
Channel Island cast on is tricky. If you can get a hold of Beth Brown Reinsel's book, this will help for her pictures are fabulous. It is a version of long tail or slingshot cast on. I have made an effort to explain it, in my own fashion, on this web page, and perhaps some of you will find it helpful:
channel island cast on
If all your efforts fail, do not despair....just cast on any old way to get the right number.
So, get the welts done, and we'll pick this up again in a few days.
JR's Gansey -3- Body Knitting
We are looking at 2 welts knitted flat that need to be joined together so we can work in the round up to the underarm. At the bottom of this page JR gansey welt is a picture of what they will look like after we get done and are working up the body:
So, get out your larger and longer circular needle and get ready to join the welts and begin working in the round.
We need to increase stitches to achieve the body number of 140 AND we need to work in a ribbing pattern to give some interest to the transition AND we need to establish a 2 stitch purl "seam" at either side of the body. These 2 stitches will turn into the gusset "surround" when we get there and it looks and works out quite nice/ly. (Note...I ripped out this area twice to get it right, so be patient with yourself if you have to).
First...we will join the welts and create the purl "seams". We will not increase the number of stitches yet, because we will work in rib pattern which will work out "bigger" than stockinette stitch, so the fewer stitches will be fine. As we join the welts, we will overlap some stitches, which will further reduce the number we have. So, we have 63 stitches on each welt. elt 1 (front):
p1, *k1, p1* to before last 2 sts: k1; slip first st of second welt onto needle (behind the last stitch of first welt) and purl last stitch of first welt TOGETHER WITH first stitch of second welt to join. Welt 2 (back): p1, *k1, p1* to before last st; slip first st of first welt onto needle (behind the last stitch of the second welt), and purl last stitch of second welt TOGETHER WITH first stitch of first welt to join. Place marker hereabouts to denote the beginning of the round.
124 stitches should be on your needle and the welts are now joined. Work in pattern as established (rib across front, p2, rib across back, p2) for 4 rounds (or more if you get a thrill from it <g>)
Body Increase Round: We need 140 stitches for the body, and we have 124 so our increase will be 16 sts: 8 across the front and 8 across the back. Ignoring the 4 side "seam" purls, we have 60 on the front and 60 on the back....so increase evenly (sorta) at every 7th stitch.
I hate to increase on odd numbers. I really do! I like to increase on the knit stitches only, too, with LIFTED INCREASES (knit into the stitch (either front or back) of the row below the stitch on the needle...illustrated on this web site: lifted increase
so this puts me in a perplexing situation where my need to exert control just overcomes my common sense. SO... I will increase as follows: increasing on the knit sts of k1/p1 pairs only: increase on the 3rd knit, then every 8th stitch (which will be a knit) 6 times and then once on a knit before the end of the front.....repeating for the back.
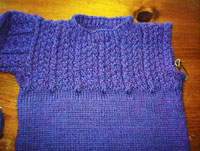
Well, if you aren't totally confused at this point, you will have 140 sts on your needle and a marker denoting the beginning of the round. Work in knit, except for the 2 purl sts at either side, KEEP THEM IN PURL, and work until your work measures 10" from the cast on edge. Here's what we have so far:
The JOINED WELTS, RIBBED TRANSITION and 2 STITCH PURL SEAM:
JR's Gansey -4- Gusset
Gussets look complicated and I avoided them for years. 10 Years ago I made a gusset-less gansey-type drop shoulder pattern (Ken's sweater to be exact) and knit up 3 or 4 of them, distributing them as gifts. As I watched them being worn, two things glared at me (the designer)...the sleeves were not being worn gracefully. Two years ago, I tried to remedy this in a remake of the pattern for my husband, and it still needed something.
Well, that something is the gusset. Gussets smooth the right angle transition from body to sleeve, and provide some room for movement without: a} messing up the established angular pattern and b}creating extra bulk under the arm. The deeper the rib created by the purl stitches that you work them in and between, the more invisible it can become. They start with one stitch, and are gradually increased at either side (this becomes an art form if you want to go there...) until they reach their broadest at the underarm itself. They are put on holders and treated as separate entities as you pick up the sts for the sleeve around the completed armhole (this happens way later in the pattern). This gusset has a purl st at either side...makes it easier to work with. Once the sleeve is started, they are gradually decreased out of existence. Neat.
This pattern has the yoke stitch pattern starting AT THE SAME TIME as the gusset. So, you will work the last 2" of the body IN YOKE PATTERN, and the gusset......in gusset style :)
So, here we go. 140 sts on your needle. 2" before you reach your side seam measurement (hem to underarm, which
in this case is 11" total} ...so at 9":
The sequence in circular knitting will be: 68 sts body front ( we will decrease one at the end to make 67); 2 sts right gusset; 68 sts body back (we will decrease one at the end to make 67); 2 sts left gusset. Markers are placed just before the gusset stitches....slip the marker, follow the gusset pattern, and then proceed across the back to the left gusset, slip the marker, follow the gusset pattern. Place a NEW beginning of the round marker to help keep your place. Start Yoke Pattern:
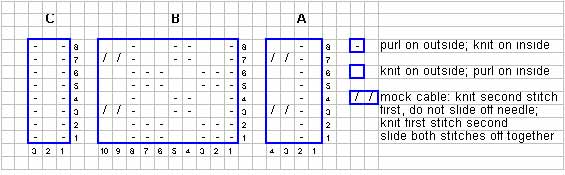
The YOKE CHART PATTERN:
Work first round of gusset, Back: as for front. Work first round gusset.
GUSSETS are worked within the P2 side seam stitches, on both sides of sweater, as follows:
Round 1, P1, INCL, P1
Rounds 2 and 3 P1, K1, P1
Round 4: P1, INCR, K1, INCL,P1
Rounds 5and 6: P1, K3, P1
Round 7: P1, INCR, K3 (this number will increase by 2 each time you work more increase rounds) , INCL, P1
continue as established, increasing in each 3rd round until you reach the dividing round for front and back.
INCL = Lifted Increase Left = lifted increase that leans to the left: knit into the back of the right side of the
stitch of the row below stitch on left needle
INCR = Lifted Increase Left = lifted increase that leans to the right: knit into the back of the left side of the
stitch of 2 rows below stitch on the right needle
Continue this way for 2" of gusset knitting. Next we separate sts into front and back and work flat. Holler when you are this far, and the pattern will continue on!
JR's Gansey -5- Yoke Area, Neck Shaping and Collar
At the yoke area, the sweater stitches must be divided into front and back, and the gussets separated out and left on holders until we are ready to start the sleeves. There are those in our ranks who prefer to make steeks and continue knitting in the round. Steeks are nothing more than extra sts independently added in at the point above the gusset that are to be cut through, folded back and tacked down to form the armhole. This is a time honored technique, but not one that I will follow for this pattern. (I will share with you the following information: superwash wools that I have used do not lend themselves well to steeking as the coating that makes them superwashable makes them slippery. Slippery yarns like to escape the tacking-down process, and I can tell you a horror story or two. I actually like to make steeks with untreated wools.)
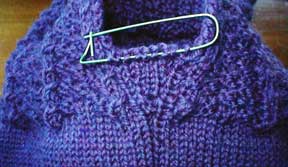
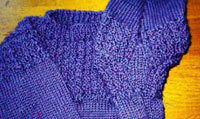
So, get out a second circular needle that is smaller in diameter than the one you are working with, and 2 stitch holders about 3" long OR 2 - 12" lengths of fat yarn. Take a look at the pattern round you are on, and be sure to finish off with an even round of the chart having just been knit: Write this round # down....you will need it again when you start the back. Work across 67 sts of front (on ODD round) slip right gusset sts onto a stitch holder slip next 67 back sts onto spare circular needle slip left gusset sts onto a stitch holder:
The GUSSET: half done and waiting for the SLEEVE PICK-UP:
opposite side of neck, bind off 1 st, work to end of row. Next row: Outside row:* Repeat * to *, until you have 17 sts left at either side of neck scoop Work evenly across these sts until yoke measures 6” from the beginning of the YOKE PATTERN.
Leave sts on a spare circular needle
YOKE BACK: Join yarn at lower right on outside of back and work evenly on back sts in pattern until it matches the
front length. You will be starting on the SAME ODD ROUND that you started the front. Leaving both sets of shoulder sts
on one circular needle, put center 33 sts of back on spare double pointed or circular needle.
SHOULDERS: Work a 3 Needle Bind off on each set of shoulder sts, starting at the outside and working in to the neck edge.
Slide remaining bind off loop on each side to needle holding center back sts.
For those of you who have never worked a 3 needle bind off, here are the directions: (Note: we want our bind off to show on
the RIGHT SIDE, so we are working it off with the wrong side of the sts held together):
3 Needle Bind Off: put both sets of stitches on double pointed needles, wrong sides together.With a third needle, knit through stitches from front needle AND back needle together once, then again (2 sts on right needle). Bind off the first stitch over the second. Continue in this manner until all stitches have been bound off. Pull yarn through the last stitch.
NECK BAND: Attach yarn to one shoulder seam. With #6 circular 16” needle, right side facing, pick up all live sts on front and back needles, along with PICKING UP AND KNITTING all likely-looking stitches along bound off edges of neck.
Picking up too many stitches is a good thing! When you have them all on your circular neck needle, count. You will need to reduce the number, as evenly as you can to 64 sts. To do this, work one round PURL on the right side, P2TOG
as needed to achieve the required number. PM. Work *K1, P1* rib for 1” Work a SEWN OFF BIND OFF with darning needle. For those of you who have never worked a sewn off bind off, here are the directions:
SEWN OFF BIND OFF: Cut yarn leaving 30”. Thread through darning needle. Cast off as follows: Darning needle goes through 2 sts as if to purl. Leave sts on needle. Darning needle goes through first st AGAIN, but as if to knit and then that st is dropped off needle *Repeat * * until all sts have been cast off. Sew yarn to first st.
At this point you should have a neat little vest on your hands. It would be a simple matter to pick up all the sts around the armhole AND gusset and finish them off in ribbing, if you are ever so inclined.
The PATTERNED YOKE; NECK SCOOP and PICKED UP SLEEVES/COMPLETED GUSSET (front):
We are headed into the home stretch of this sweater. The 2 sleeves work up quickly!
Before we get started, I want to take this space to ponder what we are about to do. This sweater's sleeve is worked in the round down to the cuff. The entire circumference of this sleeve is about 12" once we get the gusset decreased away. That's a pretty small circle to be knitting around.
In the past couple of years, knitting with 2 circular needles has become all the rage. There is a reason why: it's a lot easier on your hands and wrists than a single short circular needle. Circular needles shorter than 24" have the common flaw of too short a working end to grasp easily. Knitters who have arthritis, carpal tunnel or muscles that are headed that way (read: computer users!) have a hard time with 8.75" or 12" or 16" circular needles. Using 2 long needles is quite an interesting way around this if you do not want to use double pointed needles. If this whole idea appeals to you (and I must confess it is not something I do since I am married to my 11" and 12" circular needle collection) I will suggest the following: work the pick up round and
the first 2 rounds with a single circular needle to see how the sleeve and gusset decreases are shaping up, then try using 2 circular needles. You will knit the first half of the sts on one needle, and then drop that needle. Using the second needle, finish the last half of the sts. Drop the second needle.
*Pick up the first needle, snug up the next sts to one point and use the opposite end of the needle to knit across the sts. Drop the first needle. Pick up the second needle, snug up the next sts to one point and use the opposite end of the needle to knit across the sts. Drop the second needle. * Repeat * to *. What ever needles you decide to use, follow these instructions for the sleeve:
SLEEVES: With 12” or double pointed needles #8, PICK UP AND KNIT, right side facing, all sts around armhole. Work across gusset sts evenly. Count all but gusset sts, and decrease or increase a few in the first round to achieve 62 sts. Place marker after last purl st of gusset. 3 and 4 only of CHART A "once", then CHART B "6 times" = 62 sts
Work a total of 16 rounds of pattern, DECREASING GUSSET AS YOU GO as follows: Round 1: P1, K2TOG, K to before last 2 sts, SSK, P1 Rounds 2 and 3: P1, K across, P1 Continue decreasing in each 3rd round until you reach 3 sts. On the next decrease round, slip1, K2TOG, PSSO. On the last decrease round, P2TOG over that last lonely knit to have it slide into the P side seam. The P2 “seam” will stay in pattern all the way down the sleeve to the cuff. Sleeve stitches are now worked in KNIT.
The GUSSET: finished
SLEEVE DECREASE ; Work a 2 st decrease every 7 th round as follows: *slip marker, K2TOG, knit to last 2 sts before purls, SSK, P2* Change to double pointed needles if/when necessary. Stop decreasing when you reach 46 sts. Work evenly until sleeve measures 10.5” from sleeve pick up at shoulder. With #6 double pointed needles, knit one round decreasing evenly
to 40 sts by *k 5, K2TOG* 6 times Work in *K1, P1* ribbing for 2 ”. Bind off in PURL using #8 needle. repeat for 2nd sleeve. Darn In all ends.
Claudia at Countrywool
Check out Countrywool's knitting retreats: at Gloucester, MA , and Round Top, NY. Topics vary, but rotate back to Ganseys every few years.