(to purchase a seamless Aran sweater pattern featuring these stitches, visit
Original Countrywool Patterns )
|
59 Spring Road Hudson NY 12534 (518)828-4554 |
|
|
|
I have edited the tutorial and
presented it fully on this page.
Happy knitting!
|
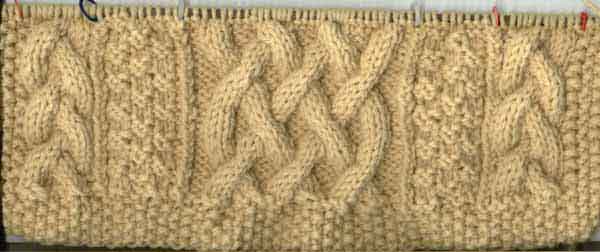
The outline of this square is achieved with SEED STITCH, so with your worsted weight afghan yarn (250 yards/4 oz) and #6, 7, or 8 needles (stockinette stitch gauge of 5 sts=1"), Cast on 61 stitches.
Work in SEED STITCH as follows for 7 rows:
*k1,p1* repeat acoss ending k1.
INCREASE ROW: (wrong side) work first 5 sts in seed
stitch, place marker, *k2, inc 1 st in row below* repeat across to last
6 sts, k1, place marker, work last 5 sts in seed stitch.= +25 sts = 86
sts total.
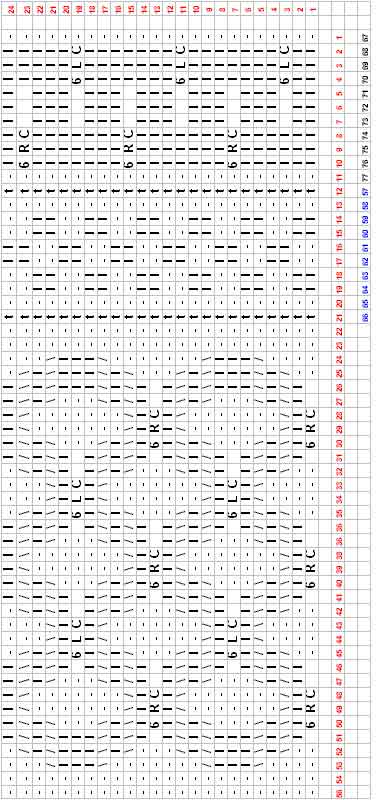
Keeping first and last 5 sts in seed stitch pattern, follow chart starting with its Row 1. (For Tutorial, scroll down past the graph). Use markers to help you keep your place in the chart...there are 5 distinct patterns and if you place a red dot where you want a marker (I like sts 12, 21, 57 and 66), you can know where you are at a glance. Odd(right side) rows are worked from right to left....Even (wrong side) rows are worked from left to right.
Please note..there is a twisted knit in the pattern which needs to be worked as a twisted purl on the wrong side when you come to it...if you have used that stitch as a marker,,,you have an automatic reminder in place!!! All the other wrong side stitches are worked as:knit the knits and purl the purls.
When working Please note that 2 sections are repeated (follow the numbers across the base of the chart) for a total of 76 sts. Adding in the first and last 5 sts kept in seed stitch...your square total is 86 sts.
Work square until it measures 11" from cast on edge. End after an
odd row
had been worked.
DECREASE ROW: work first 5 sts in seed stitch, slip marker, *k1,
ktog* repeat across to last 6 sts, k1, slip marker, work last 5 sts in
seed stitch.= -25 sts = 61 sts total.
Work in SEED STITCH for 7 rows. Bind off.
t means knit in the back loop of the stitch
- means purl
l means knit
6 RC means 6 Stitch Right Cable(over 6 sts) = Sl 3 sts (stitches)
to cn and hold to back of work, K3,K3 sts from cn.
6LC means 6 Stitch Left Cable (over 6 sts) = Sl 3 sts to
cn(cable needle) and hold to front of work, K3,K3 from cn.
//// means 4 Stitch Right Purl Cross (over 4 sts) = Sl 1
st to cn and hold to back of work, K3, P1 from cn.
\\\\ means 4 Stitch Left Purl Cross (over 4 sts) = Sl 3 sts to cn
and hold to front of work, P1,K3 from cn.
Countrywool's ARANKNIT Afghan Square Chart
copyright 2000 Claudia Krisniski...see full copyright notice at the
bottom of this pattern
COPYRIGHT NOTICE: Copyright 2000-2003 by Claudia Krisniski. This
pattern may be used by individuals
for personal use only. It can be distributed to and shared with others
as long as it
remains fully intact, including this copyright notice. It may not
be sold, used to produce items for sale, or
used in a compilation or archive of any kind without the expressed
written permission of the designer. All
rights are expressly reserved by the designer.
| C.H.A.R.T.S. --- Lesson 1 |
| First of all, I
suggest you go and print out a hard copy of the above chart and start
a file to keep track of all this info. As we examine this chart, we see a few noteworthy things: 1. The chart appears to have a surface design. There seem to be columns of same sts, patterns of double sts, and diamond-shaped patterns with the mysterious "6RC" and "6LC" notations which do not make any sense pictorially. 2. There are numbers across the bottom of the chart. First a row of red numbers (1-55), and then a row of blue ones that make NO sense (67-77, 57-66). These numbers start at the right and proceed to the left in sequence. 3. There are numbers running vertically up the chart (1-24) 4. There are many repeated symbols..... " - " " I " (actually a straight line with no bottom and top additions) " / " " \ " |
| C.H.A.R.T.S. --- Lesson 2 |
| LOTS of good points came up
while discussing this lesson..... ...Dawn states that each designer uses what he/she has available...SO TRUE...and that there is no standard (also true!) ...Stephanie pointed out that sometimes chart symbols attempt to LOOK LIKE the finished stitch, and sometimes they don't even bother...but try to DEFINE the stitch with the symbols (which can result in a graph that does not appear AT ALL like the stitch it is making). She also, most helpfully, sent in the following references (I am quoting her post here): >> IK has a column on "Making Sense of Symbols" in the Summer 2000 issue on pages 78-79. Knitter's did a feature article "Chart Reading Basics" in two parts beginning with the Winter '99 issue and continuing with the Spring '00 issue>>. ...Esther sent in a reference to round out Stephanie's musings...."masters" column in the current issue of _Cast On_, which she believes to be Fall 2000. ...Tracy pointed out how helpful it is to have the stitches on the chart APPEAR VISUALLY as they will cross/slant, so that the chart is a better knitting aid. ... Lisa, esteemed author of ARANPAINT, explained how her program works and how she goes about assigning stitches to symbols. Very helpful. Here is her full explanation: http://www.egroups.com/message/Aranknit/2715 When we last left our little graph, we had noted that the graph itself seemed to have a surface pattern EXCEPT for the 6RC and 6LC notations. So.....to clearly understand what we are about here, we find it necessary to hunt for the KEY which will explain anything we don't "get" from the graph. Let's talk abut keys. They can be set up in different ways and some are easier to understand than others. This key is as follows: t means knit in the back loop of the stitch - means purl 1 means knit 6 RC means 6 Stitch Right Cable(over 6 sts) = Sl 3 sts (stitches) to cn and hold to back of work, K3,K3 sts from cn. 6LC means 6 Stitch Left Cable (over 6 sts) = Sl 3 sts to cn(cable needle) and hold to front of work, K3,K3 from cn. //// means 4 Stitch Right Purl Cross (over 4 sts) = Sl 1 st to cn and hold to back of work, K3, P1 from cn. \\\\ means 4 Stitch Left Purl Cross (over 4 sts) = Sl 3 sts to cn and hold to front of work, P1,K3 from cn. OK. We see that each stitch sequence is given a symbol AND a name AND directions on how to do it AND info on how many sts are involved. We will see, as we read through stitch directories, that different designers assign different names to the same stitch movements. This can be VERY confusing. What this chart calls a Left Purl Cross can be something else on another chart. It is very important that you take the time to thoroughly acclimate yourself to what your chart is saying before you begin!!! Janet Szabo has a nice comparative chart on the differences from a few books/designers in her HANDBOOK OF ARAN SWEATER DESIGN, page 6. I will say, that some charts leave me thoroughly confused and I have been known to take the time to rewrite them in a format that I understand better. This can make the knitting go very well, and the bonus is that by translating the chart, you get a VERY CLEAR picture of what the stitches SHOULD be doing, so it is not a waste of time at all. (I will spend a lesson on how to write a chart once we have worked through a few of them.) |
| C.H.A.R.T.S. --- Lesson 3 |
Knitting from a chart involves more than
knowing
what the stitches are. It involves understanding how to follow the
stitches
in their proper sequence in order to achieve the pattern intended.
Let's look at our chart for this lesson and we'll go over it line by line. First of all, if there is any way you can make the chart bigger, it will help you enormously, for the teeny numbers are very hard to read. At the very least, get out a fine line pen and rewrite the numbers at the bottom and up the side. OK. We notice there are numbers 1-55 along the
bottom from right to left, and then a second line of numbers along the
bottom, 67 to 77, and then 57 to 66. (In looking at the number sequence
I see
there is a mistake that no one caught...there is no 56...hmmm). These
numbers are the STITCH NUMBERS. There are numbers 1 to 24 running from
bottom to top at the right side of the chart...these are the ROW
NUMBERS.
You will notice everything starts sequentially from the bottom right
corner.
That is where we begin our chart reading! The first row of a chart is
read
from right to left....just as you work across knitting as you begin a
new
row.
So......first we cast on 76 sts. NOTE: If you would like to make this square to look as pictured, then you will need to cast on 61 sts,(there is an increase that happens after row 7 to get you to 86 sts, and a decrease that happens before the last 7 rows to get you back down to 61 sts) remembering that this particular afghan square has a border of seed stitch that will eat up the first and last 5 sts (10 sts total) and the first and last 7 rows. Those sts are not counted in the graph. Remember to KEEP THEM IN PATTERN as you come to them, IF you are making this square as directed. For teaching clarity, we will not mention them again Let me talk about markers. I love using
markers.
I love COLLECTING markers. If anyone ever wants to bring me a present
from
far away, they can bring me an unusual stitch marker <g>. My
markers
get to have personalities, and they help me remember where I am in my
knitting. I put them where it "looks" like a logical break is happening
in a pattern, and I note that on the chart. So, I will put in 4
markers, 1 each after the following stitches:
11 21 55 66
Now, we will work across in pattern. p 1 k sts 2-10 (k 9) p 1 slip marker st # 12 says to knit in the back of the loop. OK p 1 k 2 p 2 k 2 p 1 knit in the back of the loop slip marker This part of the chart is tricky because we have some spaces that don't have any symbols in them. The only way I can see to make sense of this is to refer to the key and see if it can help. If we count the squares, we KNOW there are 34 sts in this next section to my next marker after st #55, and we see clear purl sts marked (there are 16 of them), so I will assume the remaining 18 sts will be consumed by the 6RC pattern. Let's see..there are 6 sts in each pattern, and 3 sets of the pattern and 18 sts left.....yup. So, those blank spaces belong to the 6RC pattern. p 4 Sl 3 sts (stitches) to cn and hold to back of work, K3,K3 sts from cn p 4 Sl 3 sts (stitches) to cn and hold to back of work, K3,K3 sts from cn p 4 Sl 3 sts (stitches) to cn and hold to back of work, K3,K3 sts from cn p 4 slip marker Now the fun begins. First of all, we have to find the NEXT st, and we already saw the typo that gives us no st # 56, so we will proceed to st # 57 and work through st # 66. I see we repeat a pattern we already did....exactly as we did it before, so st # 12 AND # 57 says to knit in the back of the loop. OK p 1 k 2 p 2 k 2 p 1 knit in the back of the loop slip marker St # 67 is located under st # 1, and so we now repeat THAT section again: p 1 k sts 2-10 (k 9) p 1 First Row is DONE!
|
| C.H.A.R.T.S. --- Lesson 4 |
|
OK, this lesson is probably the most important
for folks who are driven mad by trying to follow charts. We will work a
wrong side row: Row 2.
First of all, it really helps to imagine the chart as a piece of knitting that you are looking at from the front side only. Then you need to think about the knit stitch and the purl stitch as being opposites of each other. What you see as a knit stitch on the front, will appear as a purl stitch on the back. If you can get comfortable with that concept, then everything will fall into place. Secondly, I have not seen many patterns that have the knitter execute anything fancy on a wrong side row. This chart has a few "twisted purls" that you have to remember. I am sure there are complicated charts out there somewhere so STAY AWAKE as you peruse a pattern before you knit it, but mostly the wrong sides are "knit the knit stitches and purl the purl stitches AS THEY APPEAR TO YOU WHILE KNITTING THEM." This means that by looking at the knitting (NOT THE CHART!!!!) you decide what a stitch is and then work its own operation on it. So, with these 2 points in mind, let's proceed
to examining the chart we have been handed:
OK...we know, from our first lesson, that we have 76 sts to work across. We realize that at the end of Row 1, we worked that last stitch # 76. So, when we FLIP THE KNITTING OVER to work across the wrong side row, we need to FLIP THE CHART OVER (remember that it is the front of our knitting as it appears to us?), so we can read logically across. Guess what...we can't flip the chart over. This is what causes confusion. We have to read it backwards...from left to right, as we work across. Here's how our chart reads BACKWARDS: Work the section of Sts 77-67 first (since it was the last section worked on the previous row) once. k1 p9 k1 Then work the section of 66-57 next (since it was the next-to-last section worked on the previous row), once. slip marker p IN THE BACK 1 (remember that twisted knit???? that was why I put the markers here...to remind you and me to do something different to this stitch) k1 p2 k2
p2 k1 p IN THE BACK 1 slip marker Then work the section of 55-22 next (middle cable section), once. k4 p6 k4 p6 k4 p6 k4 Then work the section of 21-12 next (we're
almost done!), once.
slip marker p IN THE BACK 1 k1 p2 k2 p2 k1 p IN THE BACK 1 slip marker Then work the section of 11-1 next (yes!) once.
k1
p9 k1 Knitters have come up with various ways to help themselves out of this dilemna of strangeness! 1. Take a highlighter and run it through all WRONG SIDE ROWS (which in this case, and in most cases, happen to be even rows). When you get to the highlighted rows, remember that you have to read the chart backwards. 2. Because the wrong side rows are read from
left to right, simply by putting arrows AT the first stitch of EACH
row,
folks have a reminder of which stitch they start with. So, on our
chart,
there would be arrows on the right side of the chart pointing to stitch
# 1 on rows 1,3,5,7,9,11,13,15,17,19,21,23. Then there would be
arrows
(or red stitches, perhaps???) pointing to stitch # 77 (which is really
stitch # 76...remember our typo???)on rows
2,4,6,8,10,12,14,16,18,20,22,24.
3. Copying the chart and adding all the sections to one LONG chart, so that it is fully chronological over 76 sts, will help enormously...that way you can put your "beginning arrows" up the right side of the chart on the odd rows, and up the left side of the chart on the even rows. You can then tell at a glance where the first st1tch/section starts. Some folks even go so far as to place the NUMBERS of the rows ONLY ON THE SIDE WHERE THAT ROW BEGINS. 4. Use a magnetic board and magnetic line
markers to keep track of where you are on the printed chart, and row
counters that you place on the needle or clip onto your knitting to
keep your
place in the work itself.
As you can see.....this is a universal problem, and people have invented all sorts of ways to help. But, wait....there is a silver lining in all this. How easy it would be if all a knitter had to do was work on the right side of the knitting, and always have the knitting and each row start on the right side of her work!?! Egads....no wrong side rows...no reversed stitch directions. Yes...work your aran sweaters in the round! When you read a chart you are ALWAYS on the front of the chart and ALWAYS on the front of the sweater. All the confusing rules of this lesson disappear, and you only have to remember the last lesson and how to read across the first row of a chart. Next lesson...we'll work thrugh the whole chart of this pattern to see if any problems lie ahead. |
| C.H.A.R.T.S. --- Lesson 5 |
|
Since my last post, ash sent me a very helpful
hint: if you want to have fun with working a full chart backwards while
flat knitting, but able to read it the same way as you do for the
"right side" rows (from right to left), copy the chart onto a
transparency and FLIP IT OVER EVERY OTHER ROW. Brilliant <g>
We are now going to work through the rest of the chart for this lesson. We have completed Row 1, with it's confusing chart progression reading (and licked it!), and we have completed Row 2, which is reading back backwards (or reading the chart as an opposite set of directions from right to left). Row 3 will be a repeat of the progression of reading the stitches as in Row 1, by following the numbers at the bottom and working from right to left, but with slightly different stitch directions as we come to each pattern section. We have put some markers in place to help remind us of where we are. This makes chart following SO MUCH EASIER! I highly recommend using a magnetic board with line markers under the row you need to see to keep your place on the printed chart. At a glance you can see what row you are working on. So here we go on Row 3!
sts 1-11: p1 6LC....hmm....we went through the
interpretation
of those blank spaces around this symbol back in C.H.A.R.T.S. lesson 3,
so
we see that it means:
6 Stitch Left Cable (over 6 sts). So... Sl 3 sts to cn(cable needle) and hold to front of work, K3,K3 from cn k3 p1 slip marker sts 12-21: knit in the back of the loop p3
k2 p3 knit in the back of the loop slip marker sts 22-55: p3 //// means 4 Stitch Right Purl Cross (over 4 sts)...Sl 1 st to cn and hold to back of work, K3, P1 from cn \\\\ means 4 Stitch Left Purl Cross (over 4 sts) = Sl 3 sts to cn and hold to front of work, P1,K3 from cn p2 (over 4 sts)Sl 1 st to cn and hold to back of
work, K3, P1 from cn
(over 4 sts)Sl 3 sts to cn and hold to front of work, P1,K3 from cn p2
(over 4 sts)Sl 1 st to cn and hold to back of work, K3, P1 from cn (over 4 sts)Sl 3 sts to cn and hold to front of work, P1, K3 from cn p3 slip marker
sts 57-66 (REMEMBER..THERE IS NO #56 BECAUSE OF A TYPO!) knit in the back of the loop p3 k2 p3 knit in the back of the loop
slip marker sts 67-77 p1 (over 6 sts)Sl 3 sts to cn(cable needle) and hold to front of work, K3,K3 from cn k3 p1 On to Row 4, which is REALLY easy as you just knit the knits as you see then, and purl the purls as you see them EXCEPT....remember the twisted knits on our chart? They are located right at the markers, so remember to work them as TWISTED PURLS (purl in the back loop). sts 77-67: then
sts 66-57: then sts 55-22: then sts 21-12: then sts 11-1 Rows 5-24 have no new surprises in them, so I won't go through them stitch by stitch. |
| C.H.A.R.T.S. --- Lesson 6 |
|
Hieroglyphics. Joyce, (Circular Knitting
list owner), linked that term for me to chart
reading. <g>. (And, then I had to go and figure out how to spell
it!)
Boy, is THAT an understatement! I thought this a good place to take stock of what's "out there" in terms of knitting symbolism. Janet Szabo, (Aran List owner) in her book HANDBOOK OF ARAN SWEATER DESIGN, p 6, does a nice comparative job showing how 3 different sets of stitch "shorthand" directions convey the same knitting stitch pattern. Well, the same is true with chart symbols. For instance, I will show how the charts listed below can have different ways to explain how they make similar cable stitch maneuvers. Before I continue, may I direct your attention to the year long St. Patrick's Day Afghan Project undertaken by the Aran List in 2000. The generous and talented folk who shared their own creative charts have enabled this on-line class to have instant access to examples in order that we may all learn more. I thank them all, and if any of you are inspired by what you see in their work, drop them a line and let them know. Remember
there are copyrights on each and every web published chart/page, so
follow
any instructions noted if you print them out to share. (and
thanks
to Tracy Szathmar for sharing ALL that web space with the group!)
Block 3 (by Dawn Bouch) was carefully charted
by
hand and is put up on the web here:
http://www.msu.edu/user/szathmar/block3.html Let's look at Cable 3 sts Back:
slip next 2 sts to cable needle and hold at the back; knit 1, k2 sts
from cable
needle Dawn uses a symbol like this: __ _/ Block 4 (by Linnette D. Harter) http://www.msu.edu/user/szathmar/block4.html
Linnette uses a block of 6 sts that she easily
outline-blocked
out on her chart, and
includes a description to follow each time you come to that 6-st group: LBT=Little Bow Twist= and the description follows on the page. Block 5 (by Jane Irish Nelson)
http://www.msu.edu/user/szathmar/block5.html
Jane uses text symbols (in my opinion....the best way for e-mail work) to explain her sts. There are limitations, but they are OH SO EASY to adapt to your own use and your own charting efforts QUICKLY. //// = slip 2 sts to cable needle and hold in back, k2, k2 from cable needle Block 6 (Stephanie Engle)
http://www.msu.edu/user/szathmar/block6.html
Stephanie has noted her Twist 4 Back Cable "T4B" stitch as follows:
over 4 squares (I don't have the block symbol figured out
on
text):
"a solid block of color" / / "a solid block of color" this translates (in the key, paraphrased) to: sl 2 cn back, k2, p2 cn. Block 7 (Robin Myers)
http://www.msu.edu/user/szathmar/block7.html
Robin's chart is very clear (as is her key) and seems to be full sized
(I haven't tried to
print it out). Forgive me..I can't make her elegant symbols with text... // // more or less means 2x2 cable..right cross OR sl 2 st to cable needle and hold in back of work, k2, k2 from cn Block 9 (Tracy Strickland)
http://www.msu.edu/user/szathmar/block9.html
Tracy's chart is a two-tone affair, which makes the knits and purls
really easy
to see, and her symbols are like Dawn's in Square 1: so Let's look at her symbol __ _/
the same as Dawn's (except she has it part shaded on her chart..making
the
knit/purl nature of the stitch clear) and she calls it something else: C1BP..and her directions: slip 1 st to cn and hold at back; k2, p st from cn Block 12 (Marsha Kostman) http://www.msu.edu/user/szathmar/block12.html Martha also has a similar symbol to Dawn's and Tracy's __ _/ and on her chart it means slip one st to cn and hold in back; k2, then k1 cn, so it's more similar to Dawn's, but still different. Block 13 (Katherine) http://www.msu.edu/user/szathmar/block13.html I can't wait to work this square (sigh). I'm a sucker for a good snowflake in any form. I LOVE the astrological symbols used for some stitches! These symbols are also very elegant and remind me of Robin's. My text symbols are not adequate, but here goes: over 3 sts -/ /- means 2/1 LPC (2/1 Left Purl Cross): Slip next 2 sts to cable needle and hold at front of work, p1, then k2 from cable needle Block 14 (Jeanette Heifner) http://www.msu.edu/user/szathmar/block14.html I like the use of RT and LT to denote the twisting of 2 sts as noted in the key. Very easy to remember! ___ ___| means C4B...sl 2 sts to the back on CN, knit next 2 sts, k2 from CN That wraps up the overview of chart/symbol differences. You can see that everyone is out to show a SHORTHAND way of noting what to do. You still have to refer back to the chart until you are comfortable with the stitches you are making. My thanks to Valerie who did a TON of chart work for that class, and who helped me out by proofing this lesson (as she proofed most of the squares for the afghan!) |
| Cabling Without A
Cable Needle |
Keep a small crochet hook handy in case you need |